Monday 28 January 2013

The Wisteria Challenge


Yesterday I visited the City of London Dolls House Festival.  I’ve never been to a dolls house fair before and had no idea what to expect. Never in my life, have I seen quite so many people, peering quite so hard, at objects that are quite so small, yet perfectly formed! 

The standard of the exhibitor’s creations certainly put my own little efforts to shame.  I tried not to think about the decidedly wonky, glue and sawdust encrusted handiwork, squatting on our dining room table at home, as I skulked sheepishly around the fair, sure that they’d be able to spot the imposter who did not belong in their world.

But rather than tar and feather me with miniature handcrafted plumage, they seemed happy to let me browse. And so I managed to overcome my awe, long enough to make a few modest purchases, including some lovely handmade turquoise glass bottles and an oil lamp from Ray Storey Lighting who even kindly wired the lamp for me.

I have always dreamed of owning a wisteria and last year our neighbours presented us with one, so I’ve been looking for a tiny one, or a way of making one, to add to the mini house. 

I’m pleased to say the search is over. I found one at the Festival, in the form of a wonderful, if somewhat challenging, kit made by Georgina Steeds at The Miniature Garden Centre. 

In kit form ready to be transformed into a thing of beauty and a joy to behold forever.....
It comes with full instructions and four little bags containing all the miniscule parts required to create a very realistic plant.

Sadly for me, it is not supplied with little bags full of the expertise or patience I am going to need, to turn it into a Wisteria anywhere near as fabulous as the one they had on display.  Nor does it come with a spare pair of eyeballs for when mine become so crossed they need replacing.

But I’m up for the challenge.  I just hope I am up to the job.  I don't think I could cope with having my a*** whooped by a plant.

Image copyright: The Miniature Garden Centre
The finished product as made by Georgina Steeds at The Miniature Garden Centre.
Image copyright: The Miniature Garden Centre
I can only live in hope mine will look half as good as this once completed.
Image copyright: The Miniature Garden Centre

Having left Mr PJ waiting for me outside the Festival, afterwards we took a stroll along the Thames Path to the Captain Kidd in Wapping, where I showed him what I had bought.  Including a tiny wooden dolls house by Jacqueline Crosby Miniatures….

He rolled his eyes and asked if that meant I will now need a mini house, for the mini house’s mini house.  He has a point.

Wednesday 23 January 2013

Jurassic Parquet....

I'm a bit obsessed with fossil hunting.  Sadly, I know next to nothing about the actual things I find, apart from the fact that, one, they all crawled, swam, or generally bobbed about on our planet, two, they are all very, very old, and three, some of them should never have been hit with my little yellow fossil hammer.

A trip along the Jurassic coastline at my favourite holiday destination of Whitby in North Yorkshire, always ends with my handbag being weighed down with enough "seaside rock" to pave a municipal carpark. And none of it tastes of mint or is phallus-shaped. Well, belemnites being the exception to the rule.

The ones that have survived my eager hammering in the hope they will spring open to reveal the ultimate ammonite, are safe and sound at home in a big wooden box.  The ones that didn't, are lying in tiny shattered pieces along the coast. I apologise in advance for my small part in North East Yorkshire's coastal erosion.

Conservation issues aside, imagine my excitement when a trip to a local stone mason for some sandstone for our back garden, uncovered a pile of large fossil paving slabs. Not real, sadly, but "fossilly" enough to have me loading up as many as the old Saab's suspension could cope with, before crawling back home up the A30, with the exhaust dragging on the ground.

Once at No. 1 Heatherside Corner, they were installed with enthusiasm in our tiny front garden, before being brushed with wood stain and embedded with grit, to make them look more realistic.

We are in good company, I believe these have been installed at the Eden Project too 
The Mini House doesn't really have a front garden, it has a veranda. But seeing as the fossil slabs are inches away from the real front door, it only seemed right and proper that the Jurassic Coast should come to the Mini House too.

Having (somewhat unsurprisingly, it has to be said), unsuccessfully scoured the web for "dolls house fossil paving slabs", followed by "tiny fossil tiles" I decided I'd resort to the Fimo polymer clay in the loft,  left over from another project.

Only one slight snag. It was bright pink.

I spent three hours after work one evening, rolling up tiny clay balls, then pressing them into the centre of a real (and all in one piece) ammonite, that is set into a large chunk of rock, which my other half bought for my birthday.

Not totally ideal, as they are imprints, not the actual concave shape, but as near as dammit. And more worryingly, the birthday present fossil has been left with a slight candy floss hue, which I'm hoping lovely husband doesn't notice, as even a surreptitious scrubbing with a tooth brush didn't dislodge the last few remnants of cerise Fimo from its crevices...

After baking the tiny, and literally "hot pink", ammonites, I glued them all to a card template, with lashings of wood glue, before sprinkling coarse ground black pepper in the gaps, as gravel, then spraying with, yes, you've guessed it, more of my trusty pewter spray paint, with a dry brush of copper acrylic over the top.

After a bit of a buff with a soft cloth, I think they look rather dandy. However, once the rest of the Mini House is completed I might add more gravel (black pepper) and a few leaves (mixed herbs) to make it look more weather beaten.

And maybe, a small, hopeful figure, in an anorak, with its yellow fossil hammer raised in the air.....

The fossil path takes on a slightly more cobbled appearance than its real counterpart, for now.

Hodge

Hodge the cat belonged to Dr Samuel Johnson, the English writer and critic, who is most famous for his "Dictionary of the English Language".

Hodge was so loved by Johnson that he was mentioned in James Boswell's biography on the great writer:
 "I never shall forget the indulgence with which he treated Hodge, his cat: for whom he himself used to go out and buy oysters, lest the servants having that trouble should take a dislike to the poor creature. I am, unluckily, one of those who have an antipathy to a cat, so that I am uneasy when in the room with one; and I own, I frequently suffered a good deal from the presence of this same Hodge. I recollect him one day scrambling up Dr. Johnson's breast, apparently with much satisfaction, while my friend smiling and half-whistling, rubbed down his back, and pulled him by the tail; and when I observed he was a fine cat, saying, 'Why yes, Sir, but I have had cats whom I liked better than this;' and then as if perceiving Hodge to be out of countenance, adding, 'but he is a very fine cat, a very fine cat indeed."
A year or so ago, we visited Dr Johnson's House at 17 Gough Square, London. If you ever get a chance to look round it, do, as it is one of London's historic hidden gems.

Hodge, sitting squarely on a copy of the famous dictionary with his oyster dinner next to him, is immortalised in bronze on a plinth in the centre of the square.

In the house, they sell small resin copies of the bronze Hodge and we came away with one, which now lives in our dining room.

When I first started the Mini House Project, my husband said "You're not going to try and make Hodge are you, he'd be far too small?"

Well, Fimo polymer clay is a wonderful thing, and that is fighting talk.

Sprayed in my favourite pewter spray paint and dabbed with a thin layer of copper acrylic, the Mini Hodge is very small and not quite perfectly formed, but the thought was there, if not the modelling skills.

I hope Dr Johnson would approve.

Mini Hodge is not to 1:12 scale, as if he was I wouldn't have been able to see him, to make him!


From his Dictionary of the English Language:

Cat. n.s. [katz, Teuton. chat, Fr.] A domestick animal that catches mice, commonly reckoned by naturalists the lowest order of the leonine species.

'Twas you incens'd the rabble:
Cats, that can judge as fitly of his worth,
As I can of those mysteries, which heav'n
Will not have earth to know. Shakesp. Coriolanus.
Thrice the brinded cat hath mew'd. Shakesp. Macbeth.
cat, as she beholds the light, draws the ball of her eye small and long, being covered over with a green skin, and dilates it at pleasure. Peacham on Drawing.

Tuesday 22 January 2013

"Printer's Lead" roof flashing

One of the handy things about working at the family printing firm, especially one that has been in business for over 100 years, is that we have an old Victorian factory full of random bits and pieces that are no longer used in printing, but which can be put to good use on the Mini House.

Printer's Leads are just one such thing. They are strips of thin lead that were used in hand typesetting to space lettering.

My Father in law has a big box full of them, left over from the years when all typesetting was done without the aid of an iMac. He occasionally still uses them when we get a specialist order.

His box is considerably emptier since I discovered it...

They are easy to cut with a scalpel, and the thinnest ones are pliable enough to score and fold. They make perfect roof flashing. I'm sure I will find other uses for them as the Mini House Project continues. 

I was very happy the day I found them in the factory. Father in law, less so.

The lead flashing made from printer's "leads"

The Shrubbery

I'm not green fingered by nature and am really quite a danger to all plant life when attempting any form of gardening. So when I had the idea a while back, of "enhancing" the approach to our real house with some topiary, I thought I would play it safe, for the plants at least.

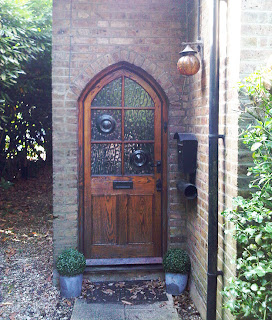
Real front door
The not very impressive afterall "real" topiary...
Instead of buying the real thing and artistically clipping it into some whimsical shape for the amusement of all to see, I trotted to our local garden centre and purchased two, not very realistic, but user friendly, fake privet balls and popped them on top of a couple of zinc flower pots. Job done. I had myself a shrubbery! And no watering needed.

To make the same for the Mini House was not quite so simple. For a start, I didn't want to spend any money, and the only 1:12 topiary I had seen was made of resin, was very costly, and even less realistic than my plastic balls!

So, having found two smallish Christmas tree baubles and some hollow plastic pipe, I attempted to make something similar to the real(ish) thing on our doorstep.

I have "acquired" from my Father in law's paint stash, some amazing pewter spray paint, which I have already used on the roof and hearth in the Mini House. It has graphite in it, so once dry, you can buff it to a sheen with a soft cloth. It worked really well on the cut pipe to make the zinc flower pots. And to make them look water stained, I added a bit of watered down white acrylic dabbed on with my fingertip.

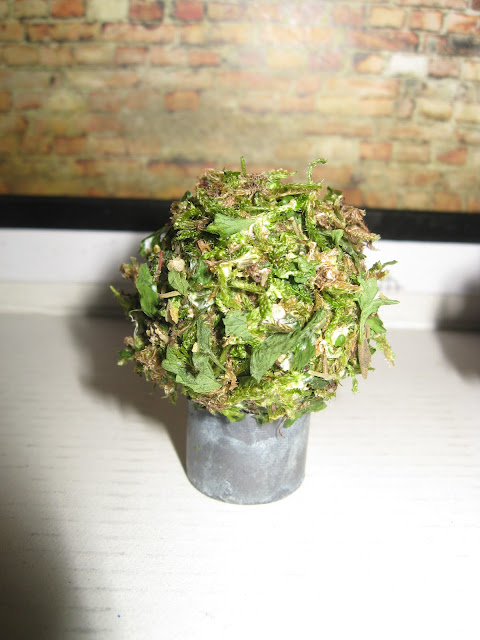
The shrubs themselves are made from the baubles covered in green acrylic paint mixed with sawdust and wood glue. Once dry, I coated them in another thick layer of wood glue, before rolling them in freeze dried mixed herbs from the kitchen cupboard, and more sawdust. Then a coat of matt acrylic varnish and a second layer of herbs, with an additional a sprinkling of moss picked from our neighbouring woods, which I dried and chopped into tiny fragments. Finally a few individual herb leaves were added with a spot more wood glue.

And these are the results. Not strictly in proportion but good enough I hope.

The mini version looking slightly less fake than the "real" thing


"Then, when you have found the shrubbery, you must place it here, beside this shrubbery, only slightly higher so you get a two-level effect with a little path running down the middle." Head Knight of Ni, Monty Python's Holy Grail 

Monday 21 January 2013

The arched front door

Although the plan was to make the inside of the Mini House echo the interior of No 1. Heatherside Corner, the outside was never going to look the same. For a start, we don't have an ornate wooden veranda on either level, or bay and dormer windows.

The real front door
The real deal
We do have an arched oak front door though, which is something the Mini House did not possess.

In fact, its front door was a little odd. While most of the external fittings were obviously part of the original kit, its previous owner had gone "off roading" when it came to the front door. It was half the size it should have been, and only the most vertically challenged Bender would have been able to walk upright through it.  So it had to go.

I'm not blessed with an aptitude for carpentry. So armed with my Bosh multi tool and a sense of purpose, but with a slight feeling of dread that if I got this bit wrong I would ruin the whole of the front of the house, I made a bigger hole.

With my rudimentary woodworking skills holding me back somewhat, I had hoped that I would be able to buy an arched front door kit. But it became apparent from searching the various dolls house forums, that unless I wanted a large glass-free ledge and brace church door, I was out of luck.

Without the necessary skills to whittle one from scratch, I settled for the next best thing. Divine inspiration, you could call it. I bought a gothic church window kit instead.  This gave me the frame (cut down as the door frame) and the internal surround (which became the surround of the actual door).

Together with some window struts left over from the first patio door kit I bought (which went wrong at an early stage and fell apart), and an off-cut of ply, I have made a slightly wonky, but reasonable stab at an arched door.

The addition of two glass bullseyes was supposed to finish it off, but I'm not entirely happy with them at the moment. I really need a way of making the glass look more "Flemish", as they stick out like two sore thumbs, but as yet have no ideas how to go about it.

Any suggestions would be gratefully received.

The Mini House front door
My slightly wonky version of the real thing with a large amount of artistic license thrown in for good measure


Friday 18 January 2013

The Mini House Project


As children, growing up in the 1970's, my sister and I shared a much loved dolls house.

Mr and Mrs Bender lived there with their children Tommy and Sally. Probably socially inappropriate today, their surname was down to the flexible wire in their legs, which would pop out of the back of their knees, if you bent their legs the wrong way.  We did that rather a lot. It was a novelty. Our own small legs only bent one way. Unless you count the time, when aged 10,  I was doing hobby horse jumps in the back garden and ripped a ligament in my left knee. Then, and only then, I understood what we had put the Bender Family through.

The Benders owned the smallest bar of pink plastic soap I’d ever seen, which kept getting vacuumed up, when we carelessly and frequently lost it in our bedroom carpet pile. It had to be regularly rescued by our long suffering Mother from the Hoover bag, to placate her two sobbing infants, and four small, unwashed, rubber people.

Having no children between us, our beloved dolls house has been handed on over the years to various extended family children and I suspect the Bender Family have relocated to the Big Dolls House in the Sky.

I'm all grown up now, on the surface, but secretly I wish it was still mine.

So when I spotted a dilapidated dolls house in a local antique centre, looking for a new home, I bought it.

It wasn't old or handmade, as ours had been. It was a modern flat-pack kit based on a Victorian house, which someone had attempted to put together and furnish. Rather badly, and in an enthusiastically "gluey" fashion.

I thought I would do it up, for fun. But that wasn't really a challenge, when you can buy anything your heart desires, ready made, for dolls houses nowadays.

One evening, while contemplating how to strip the weird, green, brick patterned paper off the exterior, I had an idea. Why not try to make it, or the interior at least, look like the inside of our life-size Victorian cottage, which my husband, pooch and I have renovated over the past 8 years?

And so it started.

Turning the Mini House into No.1. Heatherside Corner.

This blog follows the successes and failures of the project....

The Mini House arrives at No.1 Heatherside Corner